Is post me aapko Ubuntu 18.04 par LEMP stack (Linux, Nginx, MySQL, PHP) install karne ki step by step with example hindi jankari milegi. Aap next 5 minute me apne server par LEMP stack install kar sakte ho. How to Install Linux, Nginx, MySQL, PHP (LEMP) on Ubuntu 18.04? LEMP setup Beginner Guide for Blogger sin Hindi.

LEMP stack install karne ke liye kuch jaruri requirements hai jo aapko complete kar leni hai. Uske bad aap niche di gayi step by step guide ko follow kar ubuntu server par LEMP stack install kar sakte ho.
1. Buy Cloud Server
Sabse pahle aapke pas ek cloud server hona chahiye jis par aap LEMP install kar sako. Aap DigitalOcean se $100 free credit ke sath cloud hosting buy kar sakte ho.
2. Server Setup
Cloud hosting purchase karne ke bad aapko us par droplet create karna hai. Jiski jankari main already is post me de chuka hu.
3. Log in on Server
Droplet create karne ke bad aapko PUTTY ki help se server par login karna hai taki aap us par via command type kar LEMP install kar sako.
Jab aap in 3 steps ko complete kar le to niche di gayi guide ko follow karna shuru kare.
How to Install LEMP on Ubuntu 18.04 – Complete Guide in Hindi
Ek bar jab aap puar ke three steps ko complete kar le to hi in steps ko follow kare aur har ek command ko sahi se type or paste kare taki koi problem na ho.
Ye tutorial Linux, Nginx, MySQL, PHP (LEMP Stack) install karne ke bare me nahi LAMP yani Linux, Apache, MySQL, PHP ke bare me nahi.
Step 1: Install Nginx Server
Is process ke liye use kiye jane wale all software direct Ubuntu ke default package se aayenge. Iska matlab hai ki hum installation ko complete karne ke liye package management apt ka istemal kar sakte hai.
Actually, hum first time apt use kar rahe hai so hume server local package index ko update karna chahiye. Hum is tarah se server update karenge uske bad nginx install karenge.
$sudo apt update
$sudo apt install nginx
Ab Ubuntu 16.04 par nginx ko installation par run karne ke liye configure kiya jayega. Jab nginx installation process complete ho jaye to aap apne server IP address ya domain ko is type se browser me open kare.
http://server_domain_or_IP
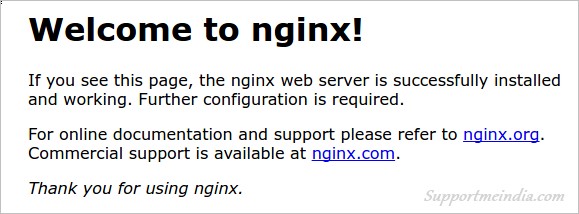
Ab aap nginx default landing page par pahuch jaoge jiska look kuch is type ka hoga.

Agar aap is tarah ka page dekhe hai to iska matlab hai aap successfully Nginx install kar liya hai.
Step 2: Install MySQL to Manage Site Data
Ab jab humare pas ek web server hai to hume apni site data ko store and manage karne ke liye MySQL database management system install karne ki jarurat hogi.
Aap ise type karke easily MySQL install kar sakte hai.
$sudo apt install mysql-server
MySQL system ke bhitar upyog ke liye aapko root (administrative) password provide karne ke liye kaha jayega. Aap databae ke liye apne hisab se koi bhi password type kare.
Aapke password type karne ke bad aapko password re-enter karne ke liye kaha jayega. Password re-enter kar OK par click kare ya enter key button press kare.
Ab kuch hi time me MySQL complete install ho jayega. Aap chahe to installation ko secure kar sakte hai uske liye ye command use kare.
$mysql_secure_installation
Ab aapko password ke liye pucha jayega, yaha aapko MySQL root account password use karna hai jo aapne mysql install karte time set kiya tha. Ab aap apne hisab se password secure kar sakte ho.
Enter current password for root (enter for none): Just press the Enter
Set root password? [Y/n]: Y
New password: Enter password
Re-enter new password: Repeat password
Remove anonymous users? [Y/n]: Y
Disallow root login remotely? [Y/n]: Y
Remove test database and access to it? [Y/n]: Y
Reload privilege tables now? [Y/n]: Y
MySQL password ko apne computer par kahi par save kar le baad me database user create karte time iski jarurat padegi.
Step 3: Install PHP for Processing
Ab humne Nginx server install karne ke sath humare data ko store and manage karne ke liye MySQL database ko bhi install kar liya hai.
Lekin abhi bhi hum dynamic content generate nahi kar sakte uske liye hume PHP ki jarurat hogi. (WordPress ke liye PHP ki hi jarurat hogi.)
Iske alawa Nginx server me native PHP processing shamil nahi hai isiliye hume PHP ke sath ye bhi install karni hogi. Iske liye hum php-fpm use kar sakte hai jo “FastCGI process manager” ke liye hai.
PHP ke all type ki files ko install karne ke liye ye code line use kare.
$sudo apt install php-fpm php-mysql
PHP install hone ke bad hume PHP processor ko configure karna hai.
Configure PHP Processor
Humne PHP ko successfully install kar liya hai lekin hume apne setup ko or jyada secure karne ke liye thodi slight configuration karni hogi.
Iske liye php-fpm main configuration file ko open kare.
$sudo nano /etc/php/7.2/fpm/php.ini
Ab is file me hume cgi.fix_pathinfo parameter search karna hai. Console me search, copy, paste, delete and move karne ke lyie alag alag shortcut hote hai jo bottom me diye gaye hai.
Jaise search karne ke liye Ctrl+W, Paste karne ke liye mouse right click or delete karne ke liye Ctrl+K button use hota hai.
Is line ke first me semi-colon (;) and last me “1” hoga.
Hume semi-colon ko remove karna hai or last me se “1” ki jagah “0” set karna hai.
cgi.fix_pathinfo=0
Jab aapki editing complete ho jaye to file save karne ke liye Ctrl+X key button press kar YES select kar enter key press kare.
Ab hume PHP processor ko restart karna hoga uske liye ye command use kare.
$sudo systemctl restart php7.2-fpm
Ye humare dwara kiye gaye changes ko implement karega.
Step 4: Configure Nginx to Use the PHP Processor
Ab humare pas all required components installed hai. Ab bas hume Nginx ko humare dynamic content ke bare me btana hai.
Hum ise server block level par kar sakte hai. Iske liye aap niche di command se default Nginx server block configuration file ko open kare.
$sudo nano /etc/nginx/sites-available/default
Ab aapke samne jo file open hogi usme hume kuch changes karne hai, is tarah se.
server {
    listen 80 default_server;
    listen [::]:80 default_server;

    root /var/www/html;
    index index.php index.html index.htm index.nginx-debian.html;

    server_name example.com;

    location / {
        try_files $uri $uri/ =404;
    }

    location ~ \.php$ {
        include snippets/fastcgi-php.conf;
        fastcgi_pass unix:/run/php/php7.2-fpm.sock;
    }

    location ~ /\.ht {
        deny all;
    }
}
Hume humari site ke liye is file me kuch badlav karne ki jarurat hai.
- Sabse pahle hume humare index directive ke pahle
index.phpvalue add karne ki jarurat hai taki index.php name ki file ko served kiya ja sake. - Hum
server_namedirective me apne server ke domain name or public IP address ko point kar sakte hai. - PHP processing ke liye hume line ke samne (#) symbols ko nikalkar PHP request ko active karna hai. Ye
location ~\.php$location block,fastcgi-php.confsnippet, and the socket associated withphp-fpmse juda hoga. php7.0ki jagahphp7.2add karna hai taki php file work kar sakte.
File me aur bhi lines hogi lekin hume sirf upar btayi gayi lines me changes karne hai baki ko defualt rahne dena hai. Agar aap upar btaye anuar sahi changes kar liya hai to aap file ko save kar close kar sakte hai.
Ab humne koi galti to nahi ki hai wo check karne ke liye ye command use kare.
$sudo nginx -t
Agar koi bhi error show hota hai to wapis above step ko follow kar file ko open kar sahi se configure kare or ek bar fir error check kare.
Jab sabkuch Ok ho to hume is changes ko apply karne ke liye Nginx server ko restart karna hoga uske liye ye command line use kare.
$sudo systemctl reload nginx
Step 5: Create a PHP File to Test Configuration
Ab aapne LEMP stock completely set up kar liya hai. Ye confirm karne ke liye hum ek PHP page create kar apne server par load karke test kaenge.
Hum documents root me ek PHP file bana kar aesa kar sakte hai. Iske liye aap info.php file ko open kare.
$sudo nano /var/www/html/info.php
New file me nimn lines ko type ya paste kare. Ye valid PHP code hai jo humare server ke bare me information deta hai.
<?php
phpinfo();
Jab aap editing complete kar le to file ko save kar close kar de.
Ab aap apne internet browser par ja kar apne domain name or ip address ke sath is page ko is tarike se open kar sakte hai. /info.php:
http://server_domain_or_IP/info.php
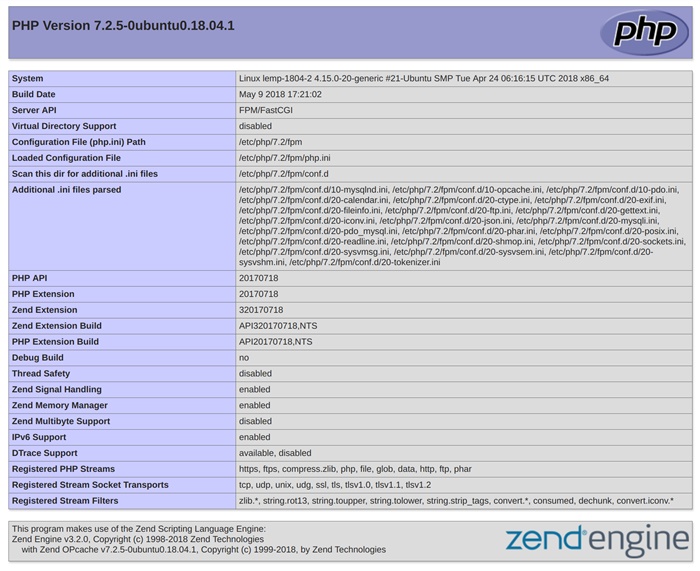
Ab aapko ek web page dikhna chahiye jo apake server ke bare me btata ho or PHP ke dwara generate kiya gaya ho.

Agar apa aesa page dikhayi deta hai to Congratulations! aapne Nginx ke sath PHP processing successfully install kar liya hai.
Actually, ye file humne sirf ye test karne ke liye banayi thi ki humara server proper work kar raha hai ya nahi. Isme aapke server ki details hoti hai jisse koi aapke server ko access karne ki koshish kar sakta hai.
Ssecurity reason se ise delete kar de, iski koi jarurat nahi hai. Is file ko delete karne ke liye ye command use kare.
$sudo rm /var/www/html/info.php
Ab aapne Ubuntu 16.04 par Nginx, PHP, MySQL yani LEMP stock ko completely install kar liya hai. Ab bas aapko is par software istall karne ki jarruat hai. Example, ab aap is par WordPress install karne ke liye ready ho.
Lemp server par wordpress install karne ki jankari ke liye humari ye post read kare.
I hope ye guideline aapke liye useful and helpful sabit hogi. Agar haa to ise social media par share jarur kare.


नमस्ते #Jdk,
क्या Php Version को सर्वर पर अपडेट करने की आवश्यकता होती है या नहीं? वर्तमान में Php 7.2 स्थापित है। आवश्यक हो तो कृपया बताये इसे अपडेट कैसे करना है?
कर सकते हो better performance के लिए, अभी 7.4 अच्छा होगा
Please provide any suggestions on this updates..
Ok
Hello JDK;
कृपया इन समस्याओं को Nginx, Ubantu18.04, LEMP सर्वर पर हल करें।
#Jdk सर, PuTTy Server Terminal Emulator में.सर्वर Update करते समय (Run करने पर यह message show आ रहा हैं –
[After Login]
..140 packages can be updated...85 updates are security updates.
[After Server Update]
root@example.com:~# sudo apt update
144 packages can be upgraded. Run 'apt list --upgradable' to see them.
Please कृपया इसे (144 packages) कैसे अपडेट करें….
run this command
root@example.com:~# sudo apt upgrade (ये मैसेज आ रहा है)
Don’t add code here, its secure, send me a mail.