Is post me aapko Ubuntu 16.04 par LEMP (Linux, Nginx, MySQL, and PHP) ke sath WordPress install karne ki (step by step with screenshot and example) hindi jankari milegi jiski help se aap apne cloud server par aasani se WordPress install kar sakte hai.
WordPress internet par sabse jyada use hone wala most popular CMS (content management system) hai. ye aapko MySQL backend and PHP processing ke sath flexible blog and website create karna allow karta hai.
WordPress platform use karne me bahut hi easy hai or aap is par plugins se kuch bhi kar sakte ho. World me sabse jyada blog WordPress platform pa hi banaye jate hai. Is tutorial ko follow karke next 10 minute me apna WordPress blog start kar sakte ho.
Table of Contents
- Ubuntu 16.04 Server Par LEMP Ke Sath WordPress Install Kaise Kare
- How To Install WordPress with LEMP on Ubuntu 16.04
- Step 1: Create a MySQL Database and User for WordPress
- Step 2: Adjust Nginx’s Configuration to Correctly Handle WordPress
- Step 3: Install Additional PHP Extensions
- Step 4: Download WordPress
- Step 5: Configure WordPress Directory
- Step 6: Complete Installation through Web Interface
- WordPress Upgrading
Ubuntu 16.04 Server Par LEMP Ke Sath WordPress Install Kaise Kare
Ubuntu 16.04 server par WordPress install karne se pahle aapko kuch jaruri process complete karni hongi.
1. Create Cloud Server
Sabse pahle aapke pas ek unmanaged hosting server hona chahiye. Aap digitalocean se free hosting le kar server create kar sakte hai. Srver create karne ke bad aapko server par PUTTY ke sath logging karna hoga.
Is sabki jankari ke liye ye tutorials check kare.
- DigitalOcean Se Cloud Hosting Kaise Kharide – 2 Month Free
- DigitalOcean Server Par Droplet Kaise Create Kare Hindi Jankari
- DigitalOcean Droplet Ko PUTTY Se Connect Kaise Kare (via SSH Key)
2. Install a LEMP Stack
Ubuntu par wordpress install karne se pahle aapko ubuntu server par Linux, Nginx, MySQL, PHP (LEMP) install karna hoga. Iski jankari ke lyie ye tutorial check kare.
3. Secure your site with SSL (Optional)
Agar aap apni site par HTTPS SSL use karna chahate ho to aap Let’s Encrypt free SSL use kar sakte ho.
4. Domain Name (Optional)
Apni site ko open karne ke liye aapke pas domain name hona chahiye. Agar nahi bhi hai to bhi aap ip address ke sath wordpress install kar sakte ho.
In 4ro me se first 2 point important hai baki 2 ko aap bad me bhi apply kar sakte ho. Jab aap upar ki process complete kar le to niche ki tutorial ko follow kare
How To Install WordPress with LEMP on Ubuntu 16.04
Step 1: Create a MySQL Database and User for WordPress
Sabse pahle hum MySQL setup karenge. WordPress site aur users ki information manage and storage karne ke liye MySQL ka istemal akrta hai.
Hum pahle se LEMP set up me MySQL install kar chuke hai lekin hume database aur wordpress ke istemal ke liye ek user account banane ki jarurat hai.
MySQL me log in karne ke liye is command ka use kare.
$mysql -u root -p
Ab aapse MySQL password ke liye pucha jayega. Yaha aapko wo password add karna hai jo aapne MySQL install karte time mySQL root account ke liye set kiya tha.
Ab hum el alag separate database bana sakte hai jo humare wordpress application dwara use kiya jayega. Iska name important nahi hai par aap aesa name set kare jisse aapke wordpress database ko pahchana ja sake. Is guide me main databse ka name wordpress set kar raha hu.
Databse create karne ke liye ye command use kare.
mysql>CREATE DATABASE wordpress;
Note:- Dhyan rahe har command ke last me semi-colon (;) hona chahiye ye command end karta hai.
Ab humare pas ek database hai or hum ek user create karne ke liye ready hai. Yaha main account ke liye wordpressuser user pick kar raha hu or password ki jagah password hi type kar raha hu. Aap apne hisab se strong password or username choose kar sakte hai.
Username or password set karne ke liye ye command type kare.
mysql>CREATE USER wordpressuser@localhost IDENTIFIED BY 'password';
Ab humare pas ek databse and ek user hai lekin humne abhi in dono ko ek dusre se connect nahi kiya hai. Hume MySQL ko ye btane ki jarurat hai ki humara new user is database ko access and control kar sakta hai.
Iske liye aap ye command use kare.
mysql>GRANT ALL PRIVILEGES ON wordpress.* TO wordpressuser@localhost;
Ab sabkuch theek se configuration hona chahiye. Ab hume privileges ko disk par flush karne ki jarurat hai taki humare MySQL ke current instance humare dwara kiye changes ke bare me jan sake.
mysql>FLUSH PRIVILEGES;
Ab hume MySQL se bahar aana hai. Aap is command se MySQL se exit kar sakte hai.
mysql>EXIT;
Ab hum wapis main command prompt par pahuch jayenge.
Step 2: Adjust Nginx’s Configuration to Correctly Handle WordPress
Ab hum aspne Nginx server block files me kuch minor adjustments karenge. Server files ko open karne ke liye command se pahle sudo ka istemal karna hai.
Ab default server block ko is command se open kare.
$sudo nano /etc/nginx/sites-available/default
Main server block ke bhitar hume kuch location blocks ko add karne ki jarurat hai.
Hum server par wordpress install karenge to server block isk isabhi requests ko save kar lega. Inhe save karne ki jarruat nahi hai so aap /favicon.ico and /robots.txt dono ko block kar de.
Iske liye aap niche btaye example me di lines ko server block me add kare. Ye line aapko server {…} ke under add karni hai.
server {
    . . .

    location = /favicon.ico { log_not_found off; access_log off; }
    location = /robots.txt { log_not_found off; access_log off; allow all; }
    location ~* \.(css|gif|ico|jpeg|jpg|js|png)$ {
        expires max;
        log_not_found off;
    }
    . . .
}
Ab location / block ke andar hume try_files ko adjust karne ki jarurat hai taki 404 error ko default option ke roop me wapas karne ki bajaye index.php request argument ke sath control kiya ja sake.
Iska look kuch is tarah ka hoga hona chahiye. Jo line add karni hai use me red color me add kar raha hu.
server {
    . . .
    location / {
        # try_files $uri $uri/ =404;
        try_files $uri $uri/ /index.php$is_args$args;
    }
    . . .
}
Jab aap editing complete kar le to file save kar close kar de.
Ab hum is command se humare configuration errors ko check kar sakte hai.
$sudo nginx -t
Agar koi bhi error report na mile to is command se Nginx ko restart kare.
$sudo systemctl reload nginx
Step 3: Install Additional PHP Extensions
Apne LEMP stock ko install karte time PHP ko MySQL ke sath communicate karne ke liye hume minimal extensions set karne ki jarurat hai. Inke bina kai wordpress plugins proper work nahi karte hai.
Yaha hum wordpress ki better performance ke liye kuch most popular PHP extensions ko download or install kar rahe hai.
$sudo apt-get update
$sudo apt-get install php-curl php-gd php-mbstring php-mcrypt php-xml php-xmlrpc
Jab extensions installation finish ho jaye to PHP-FPM process ko restart karna hai taki running PHP processor newly installed features ko leverage kar sake.
PHP-FPM ko is command se restart kar sakte hai.
$sudo systemctl restart php7.0-fpm
Step 4: Download WordPress
Ab humara server fully configure ho chuka hai. Ab hum is par WordPress download and set up kar sakte hai. Security reason se better hai ki aap humesha wordpress ka latest version download kare.
Aap is simple commands se wordpress download kar sakte hai.
$cd /tmp
$curl -O https://wordpress.org/latest.tar.gz
Ab wordpress structure directory banane ke liye file ko extract kare. File unzip karne ke liye ye command use kare.
$tar xzvf latest.tar.gz
Ab hum in files ko humare document root momentarily me move kar denge lekin isse pahle hum in files ko copy kar lenge kyuki wordpress inko read karta hai.
$cp /tmp/wordpress/wp-config-sample.php /tmp/wordpress/wp-config.php
Ab hume upgrade directory create karni hai taki wordpress ko run and update hone me permission issue ki problem na ho.
Is command se easily upgrade directory create kar sakte hai.
$mkdir /tmp/wordpress/wp-content/upgrade
Ab hum directory ke all data ko humare document root me copy kar sakte hai. Humari permission and maintained ko banaye rakhne ke liye hum -a flag use karenge. Source directory ke end me dot . use karenge taki directory ke under sabhi files and hidden files ko copy kiya ja sake.
$sudo cp -a /tmp/wordpress/. /var/www/html
Step 5: Configure WordPress Directory
Web-based WordPress setup karne se pahle hume apni WordPress directory me kuch adjustments karne ki jarurat hai.
Adjusting the Ownership and Permissions
Hume ek aese web server ki jarurat hai jo proper work kare aur sabhi files and directories ko access and adjust kar sake. Iske liye hum apne username ke liye humare directory root me all files par ownership over kar denge.
Default username root hota hai par LEMP tutorial me maine custom username choose karne ke liye kaha tha yaha hum jdk username use karenge. Iski jagah aapko apna username use karna hai. Sath hi hum group ownership ko www-data se assign karenge.
$sudo chown -R jdk:www-data /var/www/html
Iske bad hum setgid har root directory ko document root ke bhitar set karenge. Iske karan www-data user ki primary group banane ki bajaye parent directory (jo humne set ki hai) ke group ko receive karne ke liye in directories me banayi gayi new files banti hai.
Hum is command se setgid type karke humare wordpress installation me har ek directory par bit set kar sakte hai.
$sudo find /var/www/html -type d -exec chmod g+s {} \;
Yaha par abhi kuch or permissions set karna jaruri hai. Sabse pahle hum wp-content access karenge taki hum theme and plugins change kar sake.
$sudo chmod g+w /var/www/html/wp-content
Isi process me hum web server ko in two directories me all content ko write karne ki permission denge.
$sudo chmod -R g+w /var/www/html/wp-content/themes
$sudo chmod -R g+w /var/www/html/wp-content/plugins
Ye reasonable permission ke sath set hona chahiye wanra kuch plugins ko extra changes ki jarurat padegi.
Setting up the WordPress Configuration File
Ab hume main WordPress configuration file me kuch badlav karne ki jarurat hai.
Jab hum file kholte hai to humare first business ka order humare installation ke liye kuch security provide karne ke liye secret keys adjust karne ke liye hoga.
WordPress in values ke liye secret generator provide karta hai taki aap apne khud ke good values ko try na kare. Ye only internally use hota hai isiliye ye secure hai or security ke liye better hai.
WordPress secret generator se keys pane ke liye ye command line use kare.
$curl -s https://api.wordpress.org/secret-key/1.1/salt/
Ab aapko kuch unique value milenge jinka look kuch aesa hoga.
define('AUTH_KEY', '1jl/vqfs<XhdXoAPz9 DO NOT COPY THESE VALUES c_j{iwqD^<+c9.k<J@4H');
define('SECURE_AUTH_KEY', 'E2Np+aS/p7X DO NOT COPY THESE VALUES {Ka(f;rv?Pxf})CgLi-3');
define('LOGGED_IN_KEY', 'W(50,{W^PB%PB<JF DO NOT COPY THESE VALUES 2;y&,2m%6DUth[;88');
define('NONCE_KEY', 'll,4UC)7ua+8<!4VM+ DO NOT COPY THESE VALUES #`DXF+[$atz7 o^-C7g');
define('AUTH_SALT', 'koMrurzOA+|L_lG}kf DO NOT COPY THESE VALUES 07VC*Lj*lD&?3w!BT#-');
define('SECURE_AUTH_SALT', 'p3%LZ+pAu:VY DO NOT COPY THESE VALUES C-?y+K0DK_|0h{!_xY');
define('LOGGED_IN_SALT', 'i^/G2WOQ+t$3 DO NOT COPY THESE VALUES t6**bRVFSD[Hi])-qS`|');
define('NONCE_SALT', 'Q6]U:K?j4L%Z]}yh^q7 DO NOT COPY THESE VALUES 1% ^qUswWgnxqHN&%');
Ye configuration line hai jo hume secure keys ko set karne ke liye direct humari wp configuration file me save karni hai. Aapko jo key lines prapt ho unhe copy kar notepad me save kar le.
Ab is command se WordPress configuration file ko open kare.
$nano /var/www/html/wp-config.php
Ab secret keys demo lines search kare. Demo keys ka look is type ka hoga.
. . .

define('AUTH_KEY',         'put your unique phrase here');
define('SECURE_AUTH_KEY',  'put your unique phrase here');
define('LOGGED_IN_KEY',    'put your unique phrase here');
define('NONCE_KEY',        'put your unique phrase here');
define('AUTH_SALT',        'put your unique phrase here');
define('SECURE_AUTH_SALT', 'put your unique phrase here');
define('LOGGED_IN_SALT',   'put your unique phrase here');
define('NONCE_SALT',       'put your unique phrase here');

. . .
Ab in demo secret keys lines ko hataye or apni generate ki secret lines ko yaha paste kare. I mean aapko inki jagah apni secret key add karni hai.
Important Warning: Aap apne khud ki secret ki generate kare or yaha di gayi keys lines ka istemal na kare.
Iske bad hume file ki starting me kuch database connection settings ko configure karne ki jarurat hai. I mean aapko database name, password, and username set karne ki jarurat hai.
Yaha aapko wohi database name, password or username set karne hai jo aapne MySQL ke andar database and user account create karte time set kiye the.
Iske alawa hume wordpress ko file system me write karne or themes plugins ko update karne ki permission deni hogi warna aap wordpress dashboard se plugins aur themes ko update karne par FTP error show hoga.
Main yaha wordpress configuration ki complete edited lines ke sath examle bta raha hu.
. . .

define('DB_NAME', 'wordpress');

/** MySQL database username */
define('DB_USER', 'wordpressuser');

/** MySQL database password */
define('DB_PASSWORD', 'password');

. . .

define('FS_METHOD', 'direct');
Ise dekh kar configuration complete kare or jab sab theek se kar lo to file save kar band kar de.
Step 6: Complete Installation through Web Interface
Ab jab server configuration complete ho gaya hai to hum web interface ke through installation ko finish kar sakte hai.
Apne web browser me apna ip address ya domain name type kar open kare.
$http://server_domain_or_IP
Ab us language ko select kare jisme aap wordpress use karna chahate hai.
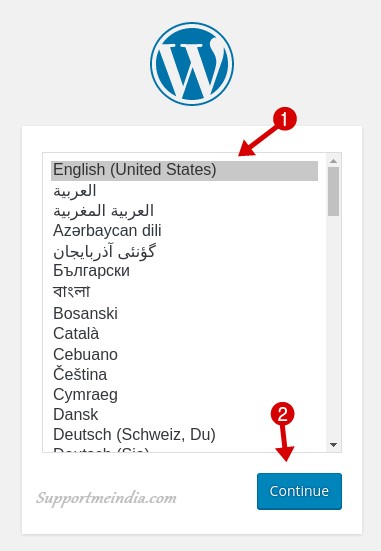
Ab aap main setup par pahuch jayenge.
- Site title: Apni WordPress site ke liye ek name select kare
- Username: username set kare.
- Password: wp dashboard par log in karne ke liye password set kare.
- Your email: apna email address enter kare.
- Finally, Install WordPress button par click kare.
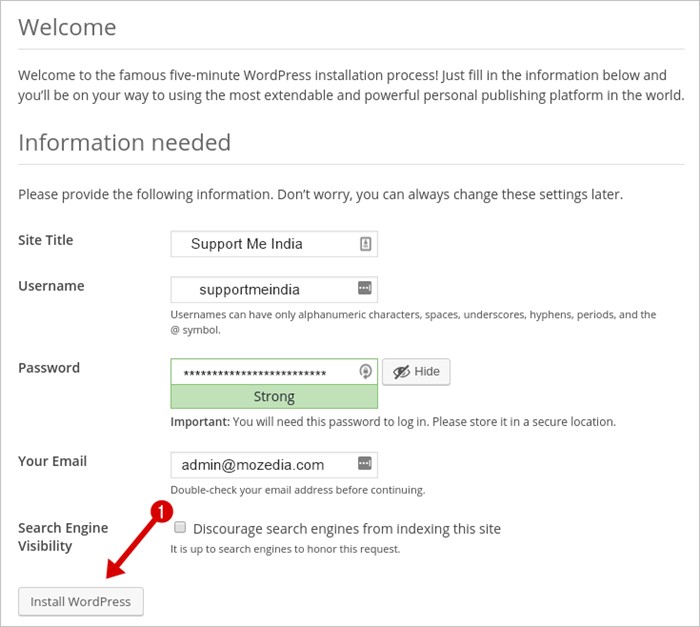
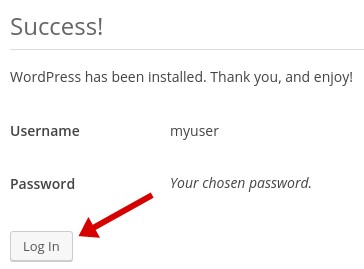
Ab aapne WordPress successfully install kar liya hai. Ab jo page khulega usme aapko log in karne ke liye kaha jayega. Aap upar set kiye gaye email address, username or password se log in kar sakte hai.
Ab aap WordPress dashboard par pahuch jaoge. Jiska look kuch aesa hoga.
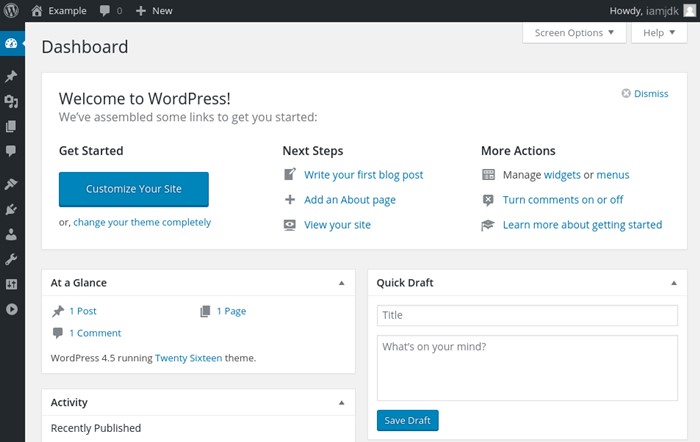
Congratulations! ab aapne successfully apne server par wordpress install kar liya hai.
WordPress Upgrading
Abhi aap jab WordPress theme or plugins ko interface ke through update karoge to error show hoga or na hi aap theme files ko edit kar paoge. Iske liye aapko wordpress ko permission deni hogi jiske liye ye command line use kare.
$sudo chown -R www-data /var/www/html
Jab aap editing comlete kar le or security reason se fir se file editing permission ko block karna chahate hai to is command ka use kare.
$sudo chown -R jdk /var/www/html
WordPress ko update karne ke liye ye jaruri hai. Ab aapkoa wordpress blog use karne ke liye ready hai. Next time WordPress par log in karne ke liye aap http://example.com/wp-admin URL par ja kar sign in kar sakte hai.
Ye thi Ubuntu 16.04 server par LEMP ke sath WordPress install karne ki hindi jankari. I hope aapke liye ye helpful sabit hogi or aap asani se iske steps follow kar cloud server par WordPress install kar sakoge.
Ye bhi padhe,
- WordPress Par Website Kaise Banaye – Full Guide in Hindi
- WordPress Ke Bare Me Ye 20 Bate Aapko Pata Honi Chahiye
Agar aapko ye jankari achhi lage to ise social media par apne friends or other people ke sath share jarur kare.

