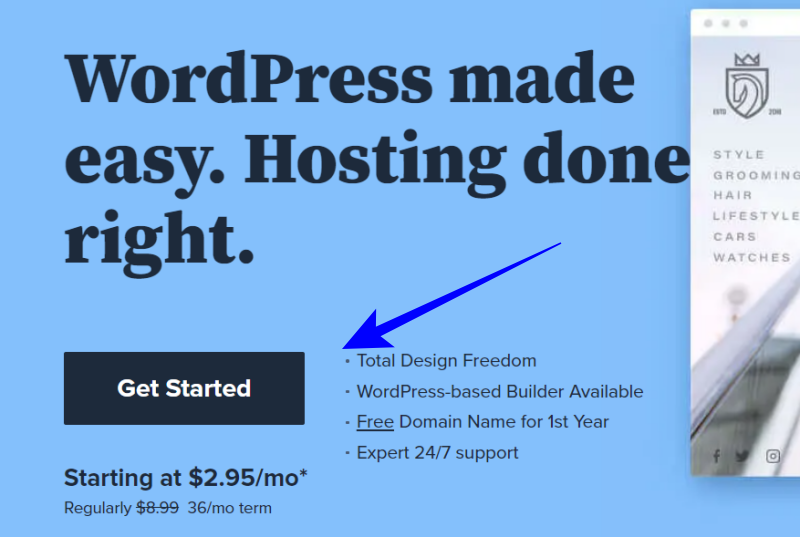
Bluehost is a one of the best web hosting company. That’s why WordPress officially recommends using Bluehost hosting.

The best advantage is that it also provides expert 24/7 support, a free SSL certificate and a free domain with web hosting.
So let’s know How to buy Web Hosting from Bluehost with a free domain name for your WordPress blog? Step by Step Guide (with Screenshot) full Guide 2024.
Many bloggers buy hosting from untrusted companies, but later, when they identify the best WordPress hosting, they regret their mistake.
We should take reliable hosting in advance. That’s why I am telling you about the official WordPress recommended Hosting, i.e.,
By purchasing hosting from Bluehost, you will get a Free Domain Name and a Free SSL Certificate along with Hosting.
Bluehost company will not only save your money but will allow you to set up WordPress from one place easily.
Before we begin, here are some things you should know.
If you are a beginner, then you need to know first about what is a domain, what web hosting is and how to buy it?
1. Domain Name
A domain name is the online address of your website through which people can access your website.
If you don’t know anything about domain names, then you need to know about them. Here is a guide that will help you to know What is a Domain Name and Where to Buy a Domain?
When purchasing hosting from Bluehost, you get a free domain name, or if you already have a domain name, you can use it. (If you don’t need a free domain name yet, you can take it later.)
When buying hosting from Bluehost, you get a free domain name. If you already have a domain name, then you can use it. (You can avail free domain later.)
2. Payment Mode
To buy web hosting or domain name, you need to have a Credit Card, Debit Card or PayPal account, through which you can make payments.
If you don’t have any of these, you can buy hosting using your friend or family member’s credit card or debit card.
And if you are from India, then you can pay through UPI (like PhonePe, Google Pay), net banking or digital wallet.
But for this, you have to take hosting from Bluehost India. By the way, if you are from India, then Bluehost India is better for you.
Now let me tell you about buying web hosting.
How to Buy Web Hosting from Bluehost with a Free Domain Name for your WordPress Blog
Here I will tell you in detail how you can buy web hosting (with a free domain) for your WordPress blog from Bluehost. So read and follow this guide carefully.
To buy web hosting, first, go to Bluehost homepage
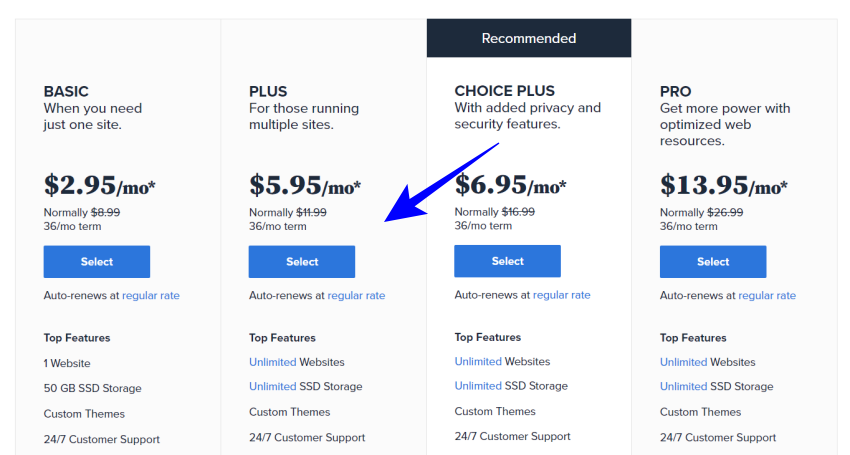
This will take you to a page where you will see four different packages. Let us tell you a little about all the plans here.
- Basic plan: You can host only one website.
- Plus plan: You can host more than one websites.
- Choice Plus: In addition to the plus plan, you also get domain privacy and site backup.
- Pro plan: In this plan, you get a Dedicated IP Address in addition to all the features of choice plus plan.
You can choose a suitable hosting plan according to your need. According to us, the Plus plan is the best to start with.
This Plus plan is best for run 1-5 blogs and good performance, but you can select a plan with your choice. Click on the Select button in the section.
After selecting a web hosting plan, you can either get a free domain name from Bluehost or use any of your existing domains.
But here, we are talking about buying hosting with a free domain, so that we will choose the free domain option now.
Step 1: Select a new (free) domain or use an existing domain.
After adding the domain, you have to click on the Next button.
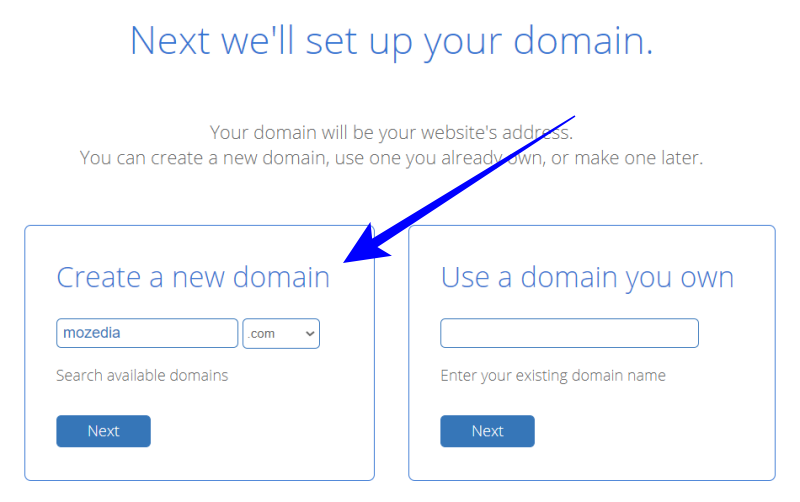
If you do not need to take the domain now, you can use the existing domain. You can also take the free domain later.
Afterward, you will just need to contact the Bluehost support team to get the free domain offer. They will fully assist.
If you are using an existing domain name, you will need to visit the domain registration site and change the Name Server in the domain set to run the site on it.
- NS1.Bluehost.com
- NS2.Bluehost.com
It takes 24-48 hours for an updated DNS record to change after changing your nameservers. In the meantime, changing the name server may cause your site to be down.
If you are taking a free domain from Bluehost, then you do not need to do this. Let’s proceed.
Step 2: Enter your account details.
After adding the domain, you will have to add your Bluehost account information on the next page that will open.
In this section, you have to enter your details (name, email id, address, phone number, etc.)
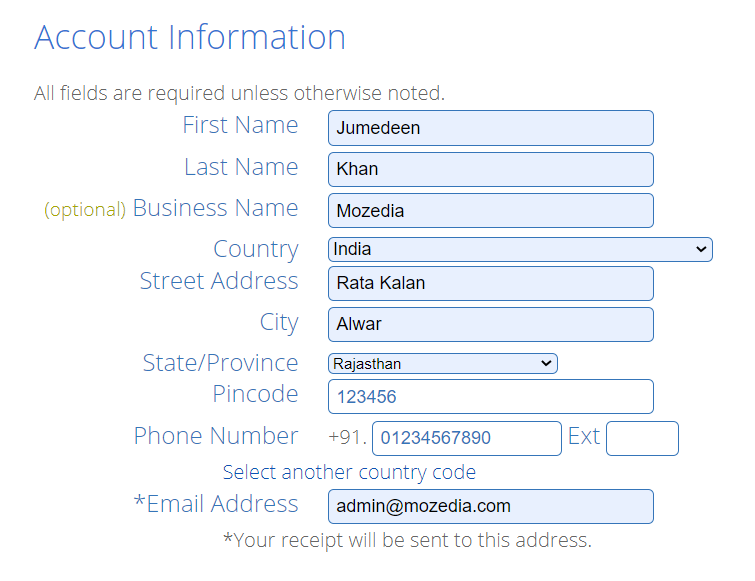
Make sure that you have filled in all the information correctly, because your login and hosting details will be sent to this email address.
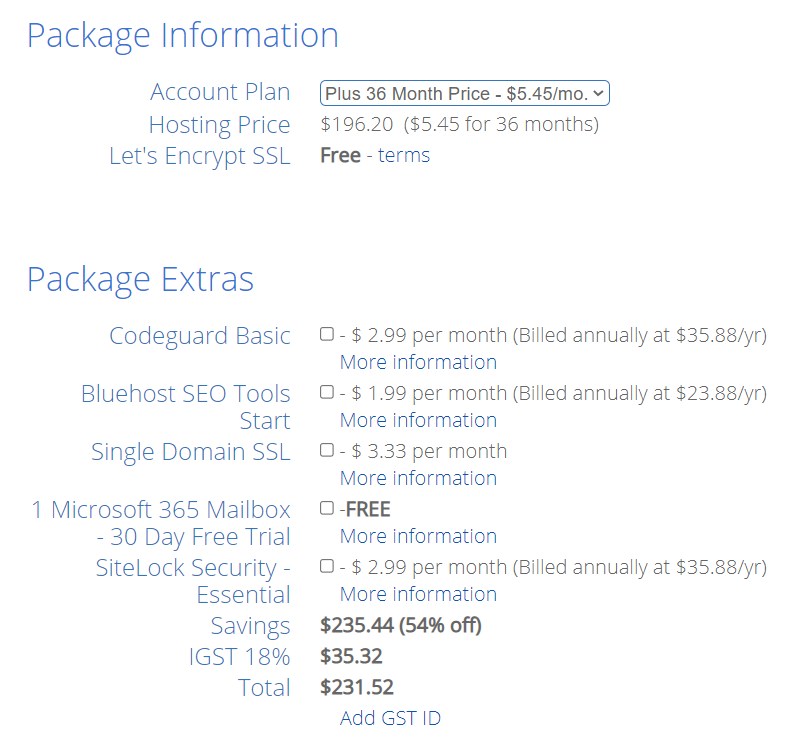
Step 3: Select the correct package.
This is the important part because, in it, you have to choose the right hosting package. So follow this step by paying carefully.
Here you have to choose the period for your hosting. You can choose a hosting package of 12, 24 or 36 months (1-2 and 3 years).
The longer you choose the package, the higher the discount. Bluehost offers up to 66% discount on 36 months package.
If you have less budget, then you can buy a 12 or 24-month plan. All other features can be ignored.
Deselect options with “Site Backup Pro” and “Sitelock Security” features, because you don’t need them.
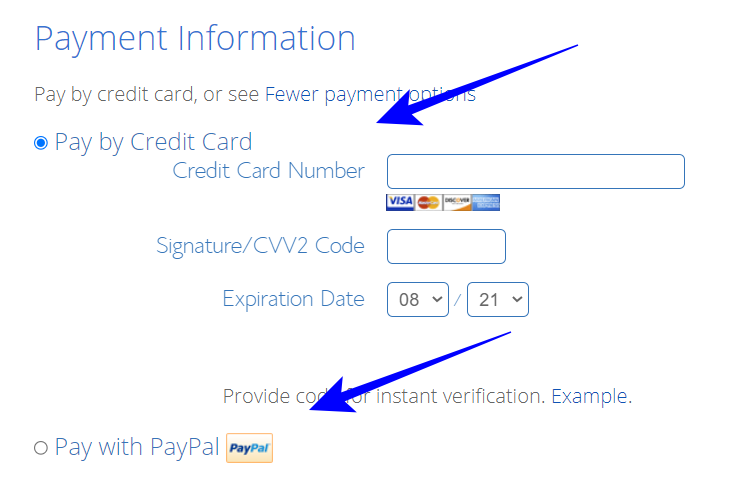
Step 4: Add payment details.
Here you have to enter payment information. You can pay with Credit Card or PayPal.
By default, you will only see the option to pay by credit card, but if you click on the “More Payment Options” link, then the PayPal Payment option will also appear.
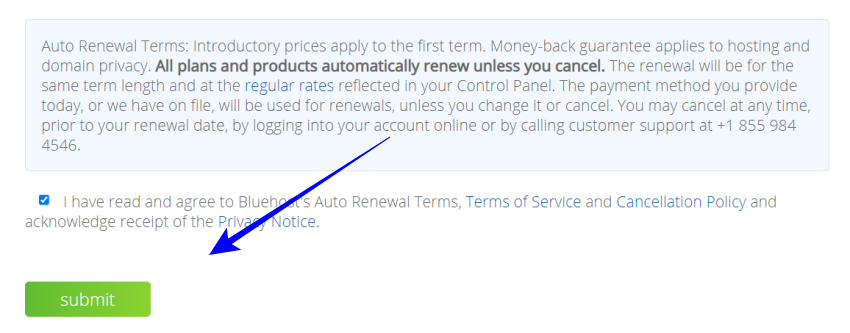
Step 5: Complete your hosting purchase.
After adding the payment information, tick the “Terms and policy”, after that you have to click on the Submit button.
After the purchase is complete, you will need to set up a password for your Bluehost account. After setting your password, a mail will come to your email address.
Confirm link and login details will be given in that mail. You can log in by clicking on this confirmation link. After that, you will be taken to Bluehost hosting cPanel.
Congratulations! You have completed the process of buying hosting from Bluehost. Now you have to install WordPress on Bluehost hosting.
We have already told about setting up WordPress blog on Bluehost hosting in this article,
- How to Install WordPress the RIGHT WAY (Complete Guide for Beginners)
If you don’t like Bluehost hosting for any reason, you can request a refund. Bluehost also offers a 30-day money-back guarantee.
That means, if you don’t like Bluehost hosting, you can get a refund within 30 days without wasting single money.
Conclusion,
This was the information about buying hosting with a free domain from Bluehost, with the help of which you can easily buy web hosting with a free domain from Bluehost.
Bluehost hosts 2+ million websites and has been in the hosting industry since 2003, so it knows very well how to provide the best hosting for WordPress.
And if you need help in starting your own blog, then you can read this article.
If you face any problem while buying hosting, then you can ask your question in below comment section.


What a wonderful knowledge you have provided with us. I appreciate you sharing this fantastic article with us.